Prepare to Register
- Resolve your holds.
- Find your registration date and time.
- Plan what classes you are going to take by reaching out to the Advising Office.
- Know how to use Course Search.
- Use Course Search to find the class you want to add to your schedule.
To participate, use Meeting ID 944 984 2296. Don't miss this opportunity to get your questions answered and ensure a smooth registration experience!
How to Add a Class
1) After finding the course you want to register for, click on the add box next to the course code and section of the class you want to add. Then, scroll to the bottom and click on "Add Courses."

2) If the course is added successfully, a yellow banner will appear, indicating the course has been added successfully. Similar to the image below:

How to Drop a Class
1) To drop a course, go back to the “Add/Drop Courses.”

2) Scroll down to Your Schedule (Registered). Select the drop box next to the course/s you want to drop. Then click “Drop Selected Courses."

DO NOT PRESS “Drop All Courses,” as this will drop all your courses (unless you intend to do so).
3) After clicking “Drop Selected Courses,” you should see a yellow banner that indicates the class has been “Successfully Dropped."

4) Please, ALWAYS double-check that the course was dropped by scrolling down to Your Schedule and verify the course is no longer there.

Dropping Block Courses
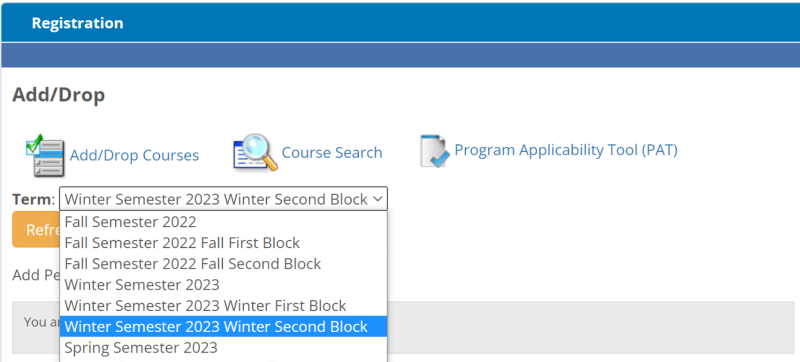
1) If you are registered in both full semester and block classes and you want to drop the block classes only you will need to select the term “Winter 2023 Second Block."

2) Now go to “Add/Drop Courses” scroll down to “Your Schedule,” select the courses you want to drop, and click on “Drop Selected Courses."

3) After, a yellow banner will appear, indicating you have dropped the course/s correctly.

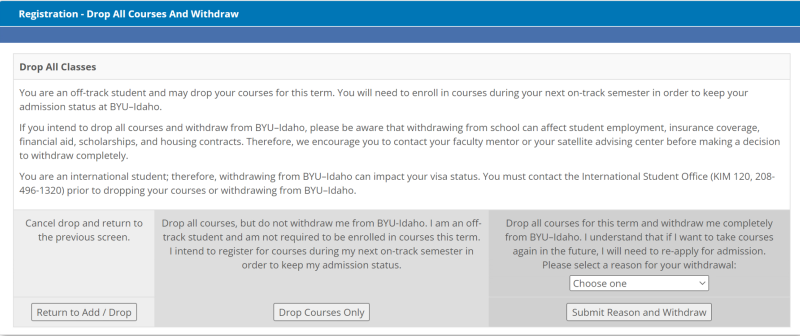
Remember that if you are dropping all your block courses, even if it’s only one course, you will be redirected to a new page (see below).
Dropping All Courses and Withdraw Message
1) When you drop all courses, either all full semester classes or all block courses only, you will be redirected to a new page with a message and three different options.

2) The message is simply informing you to verify that your financial aid, student status, or graduation will not be affected if you drop the courses. These are the three following options and how each of them will affect you:
- Select “Return to Add/Drop” if you do not wish to drop the course/s.
- Select “Submit Reason and Withdraw” if you want to drop all of your classes and stop being a student at BYU-Idaho.
- Select “Drop Courses Only” to remain a student and simply drop all courses. If you are completely dropping all of your courses both full semester and block you will be withdrawing from the semester.
NOTE: There is a difference between withdrawing from the university, meaning you will no longer be a student, and withdrawing from the semester.
For any questions regarding your student status or track please contact the Admissions Office at admissions@byui.edu or 208-496-1411.
How to Waitlist
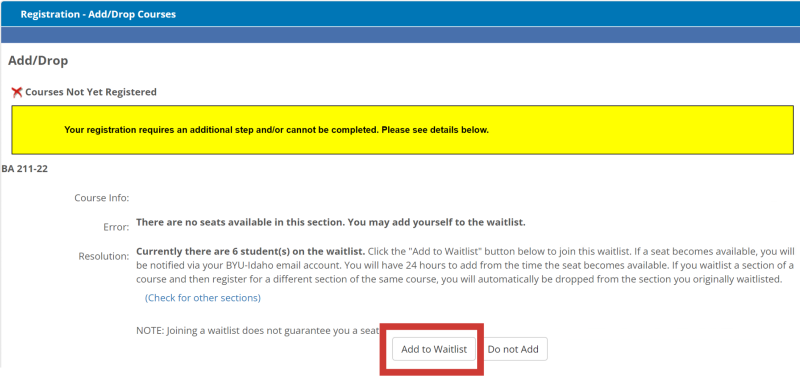
1) If there’s a class that you’d like to add and the class is full you might be able to add yourself to the waitlist. In this case, the class is full and there are 6 people on the waitlist.

2) The following message will pop up with instructions about the waitlisting process. Read through carefully and click “Add to Waitlist” if you wish to do so.

3) If you have successfully waitlisted the class, you will see a yellow banner appear indicating you have successfully waitlisted the class.

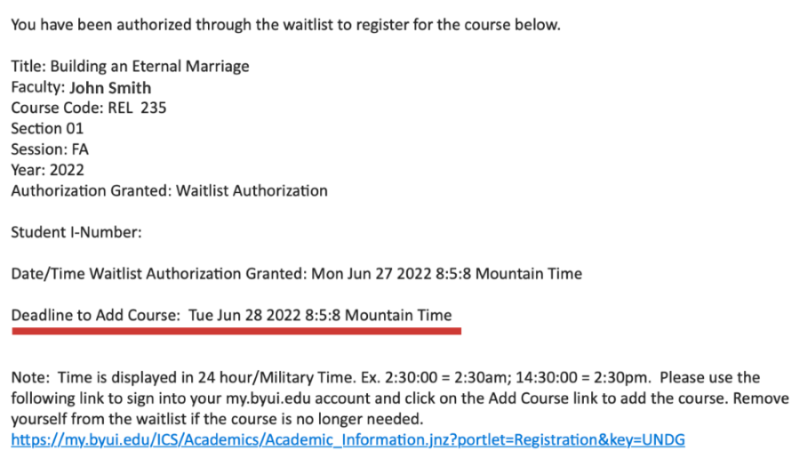
4) If a spot opens for you to add the class you will be notified through your school email or a text. REMEMBER, that you will have 24 hours to add the course. You can find the deadline to add the course in the email.

5) Once you receive the waitlist authorization go to the “Add/Drop Courses,” and scroll down until you see your waitlisted classes. Click on “Add Course” next to the waitlisted class you can add. This will register you in the class. If you want to remove yourself from the waitlist simply click “Remove from Waitlist.”

Important Waitlisting Policies
- Students can waitlist up to 12 credits.
- You cannot waitlist two different sections of the same class. The system will kick you off the first class you registered for.
- Waitlist authorizations are automated. They are sent out at any time and day of the week.
- Once a spot opens from the waitlist you will have 24 hours to add the course.
- Missing the authorization deadline will remove you from the waitlist and your spot will be given to the next person.
- If you are removed from the waitlist you will need to re-add yourself to the end of the waitlist again. Registration cannot resend an authorization or put you back at the top of the waitlist.
